Friday, December 14, 2012

Gabe's Jacket

I scored a big stack of fabric for $3 at the thrift store last month (love it when that happens-unfortunately it is rare and far between when it does!).  It was all non-girly stuff so I thought it would be nice to sew for the boy for once. I saw this gray-checkered fabric and right away I knew that it's destiny was to be a zip-up sweater for Gabe.  This is one of the few projects that turned out pretty much spot on the way I had it in my head.  Despite this jacket being fairly basic and mostly non-creative, it still makes me happy that it turned out the way I envisioned it!
I had purchased some white fleece at Joannes on black Friday, so I got it at a very reasonable price (still kicking myself for not buying MORE fleece...), plus its nice and soft and warm.  I used/altered the same pattern I used for Gabe's pea-coat last year, only this time I made a hood instead of a collar.  This was my first time making a hood, and it was super easy.  I just traced around a hood from another one of Gabe's jackets.  I just winged it for the pockets, and Gabe agreed to put a "G" and a train (no surprise there!) on the pockets.  The zipper was really easy to put in, but unfortunately it is a bit shorter than it needs to be, so I just might have to take a trip to Joannes to buy a longer one.  Last but not least, I got to work with hem tape for the first time! I bought a couple of big 'ol bags of hem tape at the thrift store way back in Arizona, not really knowing what they were, but I figured they would come in handy some day.  They did :P  I am pleased with the way the hem tape looks--very professional!
Here is the cute jacket on the cute boy:


Hem tape


Thursday, December 13, 2012

Mommy-Daughter Matching Shirts

 Another post with craptastic pictures, so sorry...but here ya go anyway.

Since I learned how to do neckline finishes on knits (I had some problems with that---but that's a post for another day!), I've been having lots of fun working with knits.  I was inspired by this here pattern because it looked easy...and it was!  I altered the pattern quite a bit (obviously, I had to make it small enough for Elisa) and I loved the way it looked (very sophisticated on my Eesa) so much that I made one for me too! Yay! We match--that's always fun! :)
I think overall both shirts turned out very professional-looking and cute.  I am amazed that I made something for me that I would actually wear in public!

And now for some god-awful pics of me and my girly wearing the shirts.  You can't see it in these pictures, but the fabric has thick stripes of subtle sparkle that is super cute! 


Got the fabric at Hobby Lobby at 50% off.  So, $6 for my shirt and $3 for Elisa's.  Not bad!  And where else will you find matching mommy-baby shirts?!  That's right...no where! I'm so glad I can sew!
Total Cost:  Less than $10 for two shirts!

Wednesday, December 12, 2012

Zebra Print Outfit

Only one post in the past month and a half! Well that's quite deceiving---I have been sewing like CRAZY this past month!  I think I haven't been posting because I have chosen to sew instead.  Oh yeah, and all the pictures I take are crap.  Better than nothing though.  I will start with the most recent, I finished it today actually!

I know the pink and zebra is soooo last year and that's probably why the fabric was 50% off at Hobby Lobby, but I couldn't resist it's shiny softness--and the cheap price!  I paid less than $5 for all the fabric.

Elisa was in desperate need of a winter outfit (it all of the sudden decided to be winter here--85 degrees last week and 50 degrees this week-geeeeeze), so I decided to make her one.  The top was originally supposed to be all pink with the black zebra for just the skirt, but when I tried the top on Elisa, it wouldn't fit over her head! Oops! Well, that oops turned out to be for the best. I split the top down the middle and made a little faux-shrug instead.  The zebra print fabric is sewn on to the pink shrug, so that it looks like two peices but it's really one.
  It is always challenging--and not to mention annoying--to work around a mistake, but in this case I'm glad I made that mistake!  I think it turned out super cute and almost no flaws now that it's done! Usually there is always something about a project that bugs me or a wish I would have done better, but this one I like.  Oh---there was one other thing--I did buy a bunch of tulle in hope of making the skirt really fluffy, but it ended up looking silly so I took it out. You'd never know though.

He is the gorgeous princess in her cute outfit, please excuse the grainy crappy pictures:


P.S...I used my new ruffler foot attachment for the ruffles around the ankles and wrists...man I love that thing!  What a time-saver.

Tuesday, November 20, 2012

Thomas Dress

Elisa's big bro just LOVES loves loves Thomas the Train, so naturally we bought tickets to go to "A Day Out with Thomas" event, and of course I couldn't resist making Elisa a little outfit for it.  I had originally planned on making a very simple, basic dress due to time constraints, but I ended up making this instead:


Elisa and her dress were a big hit at the event! I love how the ruffles turned out.  I didn't use any tutorial to make this dress, but here is a good tutorial of the "peek-a-boo ruffle skirt".

Sunday, October 28, 2012

"Upcycle" Tank Top

 I made this quite awhile ago but forgot about it! This was my first "upcycle" project.  I made it from a hideous shirt that was in a box of free crap that someone gave me.  I love doing these sorts of projects because they challenge my creativity and skills--I only have a certain amount and type of fabric to work with so it's always fun to see what I can do within those boundaries.  I kept the ribbed collar (worked around it, to be exact), added some cute ruffles and some bows on the shoulders (one is not tied in the pics, sorry) and there you have it: a cute summer shirt!  And FREE! 


Total cost:  Free!

Saturday, October 27, 2012

Lacey Pink Blouse

 Hobby Lobby sometimes has 50% off ribbon and trims so I make sure to take advantage!  I couldn't resist buying a couple of spools of lace, I bought black, light pink, and regular pink.  Pink is a definite fav in Elisa's wardrobe.  So is lace and bows.  That's why I came up with this: 
 
This shirt was a fairly easy project, the only thing I would have done differently is make the buttons and button holes go all the way down the shirt, instead of halfway so I can get it over her head easier!
As for price, it was pretty cheap to make.  $3 for the fabric, $2 for the lace=a $5 shirt!

Total price: $5

Tuesday, October 23, 2012

Sweet-Heart Dress

 She sure looks like a sweet-heart in this darling dress! I used some remnant fabric from Joann's so it didn't cost much to make.  Everything else I already had in my stash.  I made up the pattern myself.  The back has an elastic casing and it ties around the neck.  I love the neckline and that it's very simple and cute.  It's a nice summer dress, but I'll be putting a shirt underneath for the winter.  Here she is in her pretty dress, sorry, the pics aren't that great!


Total Price $4 (max!)

Tuesday, October 16, 2012

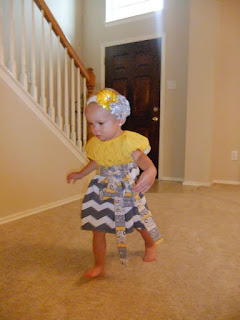
Chevron Dress

I saw this cute little dress on pinterest and thought I would try making one for Elisa.  Hobby lobby had the exact fabric I was looking for.  I used the peasant top pattern and just went from there.  I spent somewhere around $6 to make this cute dress!  Much better than the $50+ I would have spent to buy it!  Elisa sure looks cute in her little Chevron Dress:


Monday, October 15, 2012

"Upcyle" Shirt

I made Elisa this little over-shirt out of fabric from an old shirt of mine that was too big.  I have to say, projects like this are tricky because you have to work with what you got!   And I had just enough material to make her this.  I used/altered a bodice pattern I already had and added some fringe on the ends.  It was a fun, little side project and I love how easily it makes a boring onesie into a fun outfit!  I will now go through my wardrobe--which I have recently considered burning--and reuse instead of setting fire to. :)


Total Price:  $0

Sunday, September 30, 2012

Peasant Top/Ruffle Pants Outfit


I was inspired by this from etsy. So cute!

I found a free pattern for a peasant top here, and the pants are a free pattern from here.   Peasant tops are pretty easy to make.  You would think pants were too, considering they were the first project we made in my sewing class in college, but these here pants did NOT want to be made.  They fought me the entire time!  But I showed them whose boss and they got made despite their protesting.  Okay who am I kidding.  I'm an idiot and sewed the ruffles to the top instead of the bottom, not only that but I cut them out all wrong, among several other idiotic mistakes.  I had to run back to hobby lobby and buy more fabric because I messed up so bad!   Pathetic.  As soon as I start thinking, "hey, I'm getting kind of good, maybe I should start my own Etsy account" something like this happens.  I'll take it as a hint that I should NOT start up an Etsy store anytime soon.   

Regardless, this is one of my favs on her.  I love the shirt and I love the pants, even though they were a beast to make.  I love the 3 ruffles, I would make her more pants like this but now I'm scared of them...ha.  Sorry for the crappy pics, but you get the idea, she's definitely a little fashionista in this:


Price? Let's see: $2.50 for the shirt (1/2 of a yard of Hobby Lobby's fabulous fabrics) and $3 for the pants.  Okay really $6 since a screwed up.  Still, under $10 for this adorable outfit, not bad!

Ruffle-Back Dress


 Let me just start off by stating that I love Hobby Lobby.   Okay, now we can continue...


I stalk Etsy to the point of obsession, but I justify it because once in awhile I'll come across a few gems now and again.  Of course I am too poor to buy them so I just make them instead.  One of these gems includes this fabulous dress:


Adorable, right??  It's from here. Too bad it's $79 + shipping.  Yikes.  Well, going back to Hobby Lobby (a store that I LOVE), they have the most amazing selection of fabrics.  And not badly priced either.  They have a permanent 30% off sale on most printed fabric, and I cannot resist buying it!! So a month or so ago I spoiled myself  Elisa and bought some very striking and cute fabric.   Here is my version of the above dress in the Hobby Lobby fabric:


SUPER CUTE.  It came together fairly easily, the ruffles did take some time but all in all it wasn't too bad.  It's a tie-back dress with an elastic casing in the back bodice.  I love the colors, and the ruffles make it all the more striking.  Total cost?  Let's see: I paid $3 each for the lime and pink fabric (with about 3/4 of a yard left over), the black was already in my stash, and I got 1/2 yard of the print fabric so it was about $2.50! Okay so less than $10 for this dress, even less if I would have bought just 1/4 yard for the ruffles.  So one could make this dress for as low as $6. Awesome.  Oh and I got a hair bow as well!  I love Hobby Lobby.

Elisa's Christmas Dress

I know I made this dress WAY too early  (I actually made this dress several months ago), but in my defense, I was not planning on making it for Christmas--I accidentally made it a little bigger than I wanted so there is not much choice. 
I bought this fabric at Joannes a while back.  I really can't remember how much it cost!! I need to post more often so I don't forget! I'm quite sure it was no more than $10 for everything.  I used polyester costume fabric, lace, and tulle.  
This was another experimental dress that turned out quite well.  I wanted a lace-up back and a gathered bodice, and of course lots of pouf, lace, and gathers.  I think everything was exectuted pretty decently, though I would have gone about the bodice differentyl now that I (kind of) know how to make a gathered bodice. 

Isn't she stunning in her pretty red dress?  She looks like a princess.  I can't wait till she wears it, she'll turn heads for sure. 


Friday, September 7, 2012

Sew Tweet!

 Joannes had a sale a month or so ago--50% off of all remnants, which are already 50% off the regular price! Not only are remnants cheap, but they are also perfect when sewing for small children and if you're planning on mixing and matching fabric. The selection can be pretty pathetic sometimes, but luckily for me I found this cute cotton bird-print fabric.  The bodice and bottom layer are made from cotton broad cloth.  It's cheap, only $3/yard at hobby lobby.  It is quite thin, but not a problem in this dress since the bodice is lined.
I had a lot of fun making Elisa this cute little dress. I couldn't resist making a little birdie on her bodice. It is machine-embroidered on.  I only wish I would have put it on higher so it sits more on her chest instead of her tummy.  Oh well.   After the bird was done, the dress came together quite quickly.  What I love must about this dress is that it will grow with her so she can wear it for at least another year!


I'm not sure of the exact price, but I can tell you for sure that I paid no more than $5 to make this dress!

Friday, August 31, 2012

Flower Smocked Skirt Set

So this is how I employed the flower smocking technique.  It was quite tricky getting the folds to lay evenly.  If I were to do it over again, I would have spent more time making sure they were more even and straight, but I think it looks okay.  I would have also sewed the beads on instead of gluing them!  I've got such a bad habit of going all glue-gun happy.  Anyway, I love the texture and uniqueness the flower smoking gives this little outfit.

I also discovered the circle skirt technique while making this.  I LOVE the circle skirt--I love how easy it is to do (and quick too), I love how it lays, and I love how it twirls!  I didn't want a gathered skirt this time so I'm really glad I came across this tutorial on MADE (best sewing blog EVER, by the way!)

Smocking aside, the top was a pain to make, mostly because I decided I didn't like the sleeves after I put them on.  So I unpicked them and made it a tank top. However, something went askew in doing so, so it doesn't quite lay right :( It's not totally obvious, but it's bad enough to bug me.  I hate it when I sew things like that: not horrible enough to trash, but just bad enough to not want to put her in it very often.  Boo.

The fabric was 50% off at Joann's (so about $4/yard) and then I got another 25% off so I paid I dunno, like $8 including tax for two yards of this fabric.  A pretty good deal I think, especially since it's not the cheap costume fabric so it doesn't fray like crazy--it is pretty easy to work with.      

All in all, this outfit is probably one of my most ambitious outfit in terms of trying out new techniques.  I don't know how I feel about using the flower smocking on wearables.  I think most people use it for throw pillows and such, not to mention it is difficult to gauge the amount of fabric needed to get a good fit.  

This woman used a different type of smocking for a dress, I think it looks okay.  I mean, it looks okay within in the context of being on a dress.  The smocking itself is amazing.  I've tried this braid-smocking and it's fun and not too difficult. I think if the sleeves were different on this dress (or it was just sleeveless) it would look better, just my humble opinion.  But again, such a neat pattern, don't you think??

But I digress, here is the beauty in her new dress set:


Monday, August 27, 2012

Smocking!

So I've found a little corner of the sewing world that I have not previously explored and I just want to share it will ya'll (I live in Texas now so it is required of me to say ya'll). 
It's called smocking, and there are many types of smocking.  The first you have all (ya'll?)  seen before, it is especially popular with baby dresses.  Elisa has a few of 'em:

It is created by running fabric through a machine such as this:
Basically, the machine makes a bunch of tiny, even pleats, in which the seamstress then hand-stitches a design within the pleats.  Super-cute! This type of smocking is quite old-fashioned--it's been around forever--but cuteness never goes out of style!

As fun as this looks to do (and I say that in all seriousness), I do not have $200 to shell out for a pleater machine. Luckily for me though, there are many beautiful, fun, amazing smocking designs that are done by hand.

I'm not going to post them all for you, but if you go to this lady's website, you can see all the neat smocking designs you can do, and I believe she has a tutorial for a lot of them.
I tried out the easiest--the flower pattern.  You make a square, pull it together, and wrap and tie! Easy, slightly time consuming, but it looks totally awesome! Even the back looks neat:
 
  
I don't think I will be getting super into smocking, but it was fun to try it out!