At Joanes, I bought a McCall's pattern for 99 cents for a boy's and girl's coat. Elisa is way to little for the pattern size, but it was perfect for Gabe! I was so excited about making Gabe a cute, unique coat, especially since he didn't have one that fit him and we were going to Chicago, where it is of course much colder than sunny AZ. I seriously could not wait to make it!
I got called "crazy" (in a nice way) by a friend for "stressing myself out" by throwing a Halloween party the day before leaving for Chicago. What this person didn't know is that I sewed my son a pea coat in between that Halloween party and leaving for Chicago the next day!! Now that, my friends, is CRAZY!! I don't know if I'd do that again, and I really DID stress myself out that time. I literally had just finished sewing on the buttons seconds before the Super Shuttle knocked on the door. But heck, Gabe had a super cute coat that was a perfect fit and warm enough for Chicago weather.
Anyway, price wise--oh dear, I fear I went overboard and paid more than I would have for a regular coat BUT this is a 100% wool peacoat, and you know, those are NOT CHEAP!! $75 was the average going rate for a boy's peacoat. I paid $30 for everything--the wool fabric, the lining, and the buttons AND, this price includes the materials to make Gabe the adorable hat to go with the coat which regretfully I have not started yet but I plan to soon! So not bad, all things considered.
Making this coat was a big, stressful blur. The pattern was RETARDED...it didn't ask for a lining. Seriously, what toddler would ever wear a wool coat without a lining?! Luckily the lady at the cutting counter helped me pick out the right fabric for the lining, but other than that, I really had no idea how to making the lining. I used my own peacoat as a guide, and the lining turned out quite well I think. Also the directions on how to make the collar were nauseatingly confusing. I ended up not really following the pattern and just did what I thought looked right. I think the coat turned out wonderfully. The bottom hemming however is HIDEOUS. I was in such a rush that I did not take care and it looks like utter crap, but I can, and will, fix it. Soon. Working with wool was a little scary at first, mostly because I've never worked with it and it is one of the more expensive fabrics. That boy looks so handsome in his coat:
Friday, November 18, 2011
Felt Flower Hair bow
Here is Elisa's latest hair bow! FYI, in the past few weeks, Elisa has acquired approximately 10 new hair bows, most of which I bought for extremely cheap, and a few I made (will post them later). I have dubbed Elisa the hair bow queen, I am quite certain she has more hair bows than any other baby girl in the world. Quite certain.
Anyway, this hair bow was super easy and super cheap! If you buy all the materials, (20 cents for each color, 60 cents for the nylon band) it would add up to be about $1.20 for all of it, and you could make at least 4 of these. So it cost around 30 cents to make. I would like to see you try to find a hair bow this cute for 30 cents some where else!
Here is the tutorial to make the rose. Like I said, SO easy! I cut a nylon stocking into a thin strip so it doesn't look so thick, and then glued it all together!
Thursday, November 17, 2011
Baby Bling-Interchangeable Snap Bracelet
This project was my very own idea, and I am very proud of it! I love bracelets on little babies; I think they are adorable. Elisa has a few but then I thought, why not have ONE bracelet that can match with everything? I don't have room or the mind set to keep track of a bunch of little bracelets. Then I got this idea to make Elisa an interchangeable bracelet. I'm sure someone somewhere has done this before, in fact, I am certain interchangeable snap bracelets have been made for adults, but I haven't seen one made for infants.
Anyway, I had a ton of fun making all the different flowers and bling to snap on. These bracelets are SO easy to make. Just string some little pearls, and then string your snap on and tie together. The bling can just be glued on to the receiving end of the snap. You can get as creative as you'd like. The only obstacle I encountered when making these--and it may just be the type of snaps I used--was that the top of the receiving end of the snap curved up, so I had to work around that. For instance, I had a really cute sparkly button I wanted to use, but it wouldn't lay right on the snap. The red flower is a button, and I actually had to carve a dent in it (it is plastic) so it would lay flush with the snap. I couldn't do that with the metal button.
So feel free to steal my idea and make a bunch of money off it. But I doubt it will ever make it on the market due to choking hazards (actually, your baby would have to be super baby to chew the parts off and swallow them).
Wednesday, November 16, 2011
Aaliyah's Dress
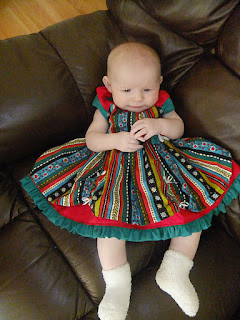
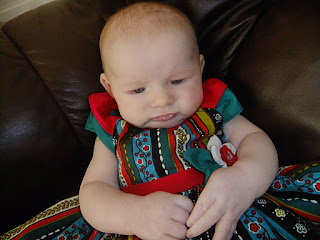
Here is the dress I made for my sweet niece, Aaliyah, which was actually a gift for my sister's b-day. I bought the fabric super cheap at Joannes, the lady said it was one of their most expensive fabrics that had been significantly marked down. I used the same dress pattern for the bodice that I've used previously. The skirt part of the dress I had fun creating. It's two-layered; the top layer is"gathered" with elastic so that a bit of the bottom layer shows through. I know, not a good explanation and the pictures don't show it that well, but I love the unique look it gives the dress. Personally, I love the pattern, but a few people think it looks African or Christmas-y. I think it looks very sophisticated and unique. And of course, it looks darling on the even-more-darling baby, Aaliyah:
I can't remember exactly how much I paid for everything (when can I ever remember?!), but it was somewhere around $5-$7. Super cheap and super cute!
I can't remember exactly how much I paid for everything (when can I ever remember?!), but it was somewhere around $5-$7. Super cheap and super cute!
Sunday, November 6, 2011
Minnie Mouse Dress
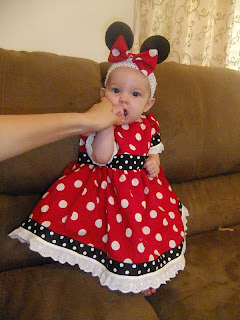
We managed to find time to go on our annual trip to Disneyland this year. We love that place!! Of course, I couldn't resist making Elisa a Minnie Mouse dress! I looked around quite a bit for inspiration on the perfect Minnie Mouse dress, and I was mainly inspired by this dress. I had a lot of fun making it, and since I've been sewing Elisa a lot of dresses with a similar pattern, I got it done fairly quickly and easily. I even had time to sew in an extra layer with tulle so the dress would be poofy. The most fun part was making the ears...I thought they would be hard to do, but I just cut out circles of some stiff black felt and glue gunned them to a bow made out of the dress fabric.
This dress was a HUGE hit at Disneyland! Elisa received lots and lots of attention from many people. Most of the comments were: "Awww...look at that cute baby Minnie!". I am so happy I made her a minnie mouse dress. With all the large crowds at Disneyland, it is nice to stand out!
I really can't remember how much I spent exactly on this dress, but I'm pretty sure it was around $10. Not too bad!
Subscribe to:
Posts (Atom)


